Before you change the configuration of your Exchange Online environment or public DNS, you should be comfortable with understanding what Sender Policy Framework (SPF) is and why it is important to properly configure. I wrote a introduction to SPF named, Blocking Spoofed Emails.
After you have added your custom domain to your Microsoft 365 Tenant, you will want to configure public DNS records to allow you to use different features. In this story, we will focus on configuring the SPF record. You can add an SPF record in public DNS, by logging into the DNS hosting provider for your domain name. This is usually the same account provided by your Internet domain registrar, but it is also possible to use one company for your Internet domain registrar and a different company for your DNS hosting.
The first thing you will need to do is determine which systems are authorized to send email from your domain name. If you are only authorizing Exchange Online to send email from your domain name, then you will want to make a note that your SPF record needs to include:1
include:spf.protection.outlook.com
See the table below for information about SPF records for special Exchange Online systems.
| Exchange Online dedicated only2 | Office 365 Germany, Microsoft Cloud Germany only3 |
| ip4:23.103.224.0/19, ip4:206.191.224.0/19, ip4:40.103.0.0/16, include:spf.protection.outlook.com | include:spf.protection.outlook.de |
If you are authorizing other systems to send email from your domain name (e.g. SharePoint Online, Mailchimp, Constant Contact, or any other system which should be authorized to send email from your domain name), you will want to have that information available too.
After you collect all of the information about the systems you are authorizing to send email from your domain name, you can either manually write your SPF record or use a website such as MXToolbox to generate your SPF record.
You can now login to your DNS hosting provider and create a new DNS TXT record. For the host, you will use your domain name; depending on your DNS hosting provider, you may enter your domain name using one of the following syntaxes:
example.com
example.com.
@
The value of your DNS TXT record will be your SPF record.
For example, if you are using GoDaddy for your DNS hosting provider and want to create an SPF record to authorize Exchange Online to send email from your domain name, this is what you would use for your DNS TXT record:
@ TXT v=spf1 include:spf.protection.outlook.com -all
Microsoft 365 can streamline the process of creating your SPF record when you add a vanity domain to your Microsoft 365 tenant.
To use Microsoft 365’s wizard to create your SPF record, you should login to https://admin.microsoft.com as a Microsoft 365 Global Admin for your Microsoft 365 Tenant, Click Settings (if you do not see Settings, you might need to click “Add admin centers” at the bottom of the list), Click Domains, Click your domain name, Click DNS records, and Click Manage DNS.
Microsoft 365, will ask you if you want to allow it to add your DNS records for you. This option may work well for many organizations, but if you need to configure custom DNS records you may wish to manually add your DNS records. To manually add your DNS records, Click Add your own DNS records.
To configure your MX, Autodiscover, and SPF record you will need to check the Exchange and Exchange Online Protection checkbox.
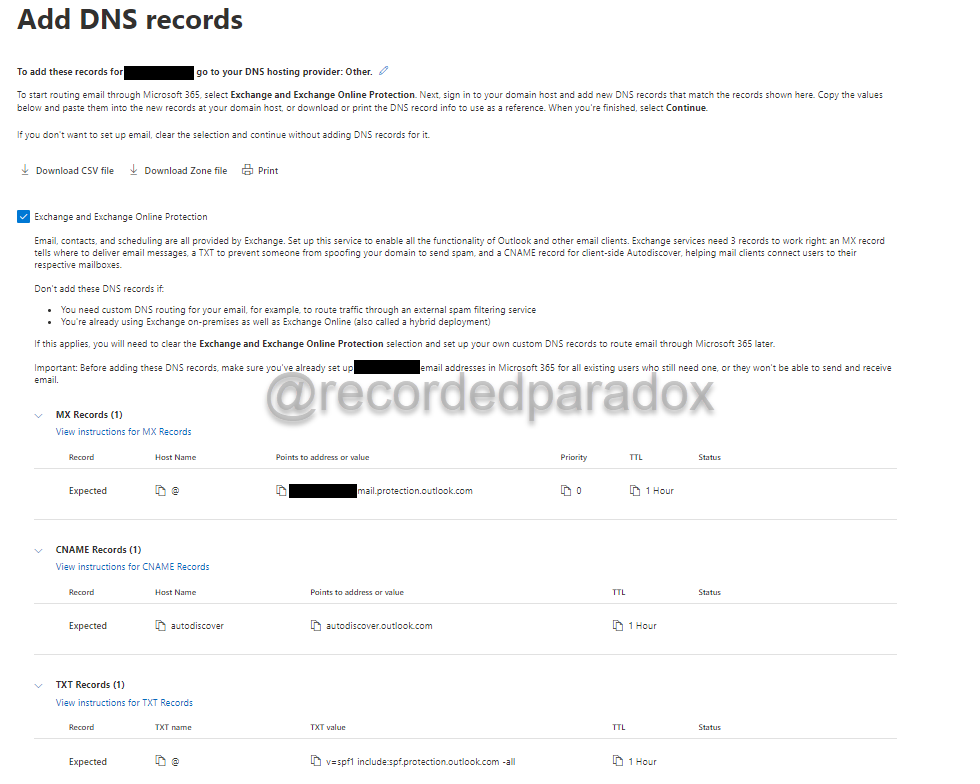
Microsoft 365 provides two important warnings on when you should not add the default Exchange and Exchange Online Protection DNS records.
- If you need to use custom email routing (i.e. if you are using an inbound email filtering service)
- If you have a hybrid Exchange Online deployment

Using third party email filtering services
For inbound email filtering, if you are using a third party email filtering service like Barracuda Email Gateway Defense, Mimecast, Proofpoint, etc. your MX record will point to your third party email filtering service so your emails can be scanned and if they are not blocked by your third party email filtering service, then sent to Exchange Online. In your third party email filtering service, you will want to configure what the third party filtering service should do when it receives an email that:
-Fails SPF verification (soft fail) -Fails SPF verification (hard fail) -From a domain name that does not have an SPF record
At a minimum, you should block SPF hard fail emails. You may consider either quarantining or blocking SPF soft fail emails and those received from domain names that do not have an SPF record.
My personal opinion is that if an email does not pass SPF verification for any reason it should be blocked. You should be aware that this is not the best solution for every organization and will almost certainly result in emails that you want to receive being blocked.
For outbound email filtering, if you are using a third party email filtering service, your SPF record will authorize your third party email filtering service to send emails from your domain name. You will also need to configure an Exchange Online Mail flow Rule or Connector (depending on your third party email filtering service) to route outbound emails through your third party email filtering service. Since your emails will be send through your third party email filtering service, it needs to be authorized in your SPF record so the recipient’s email server does not block your email (which might occur if you create an SPF record that authorizes Exchange Online to send emails from your domain name instead of your third party email filtering service).
Here are links to articles by Barracuda Networks, Mimecast, and Proofpoint on creating SPF records to permit their respective email filtering service to send emails from your domain name.
Barracuda Networks — https://campus.barracuda.com/product/essentials/doc/3211267/how-to-configure-sender-policy-framework/
Proofpoint — https://support.powerdmarc.com/support/solutions/articles/60000709907-how-to-set-up-spf-for-proofpoint-essentials
You may also need to complete additional Exchange Online configuration steps to ensure you only accept email from your third party email filtering service and you will need to decide if you want Exchange Online to filter emails it receives from your third party email filtering service or if all emails received from your third party email filtering service should always be delivered once they are received by Exchange Online.
If you need to ensure you only accept email from your third party email filtering service, you may want to create an Exchange Online Mail flow rule that requires all email sent from outside the organization to your domain name to be from your third party email filtering service. This can prevent attackers from attempting to bypass your third party email filtering service and directly sending the email to your server.
If you require inbound emails to originate from your third party email filtering service, you may need to exempt messages that are the Calendaring type otherwise, calendar invitations may be blocked.
If you want to prevent Exchange Online from filtering emails received from your third party email filtering service, then you might need to create an Exchange Online Mail flow Rule that applies to emails received from your third party email filtering service and that sets the spam confidence level (SCL) to Bypass spam filtering. If you do create an Exchange Online Mail flow Rule for this, it is very important to be certain that you are setting the spam confidence level (SCL) to Bypass spam filtering only for emails that have been properly scanned by your third party email filtering service, determined not to be spam, determined not to contain malware or other unwanted code, and delivered to Exchange Online.