DomainKeys Identified Mail (DKIM) is a solution for determining if the content of an email was modified after it was sent and to verify that the domain provided in the From address matches the domain name in cryptographic signature added by DKIM.1
Microsoft 365 enables DKIM by default for your default singing domain (e.g. example.onmicrosoft.com) but you should also enable it for each of your custom domain names.2
To enable DKIM for each of your custom domain names in Microsoft 365, you first need to create two DNS CNAME records for each custom domain at your DNS hosting provider. To illustrate the DNS CNAME records you will need to create, I will use example.com as the domain name. DKIM refers to its records as “DKIM selectors” and normally, you will need to create two DKIM selectors, selector1 and selector2.3
Here is a DNS CNAME record for the custom domain name example.com that has the Microsoft initial domain name example.onmicrosoft.com.4
Host name: selector1._domainkey
Points to: selector1-example-com._domainkey.example.onmicrosoft.com
Host name: selector2._domainkey
Points to: selector2-example-com._domainkey.example.onmicrosoft.com
After both DKIM selectors are created, you will need to login to Microsoft 365 Defender, Click Email & Collaboration, Click Policies & Rules, Click Threat policies, Locate the Rules section, and Click DKIM (or you can click https://security.microsoft.com/dkimv2).5
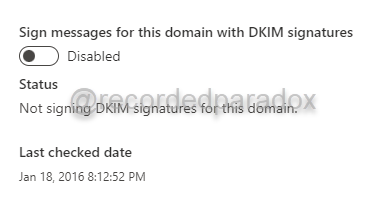
Next, you will click the custom domain name you created the DNS CNAME records for and slide the Sign messages for this domain with DKIM signatures toggle button to Enabled.6
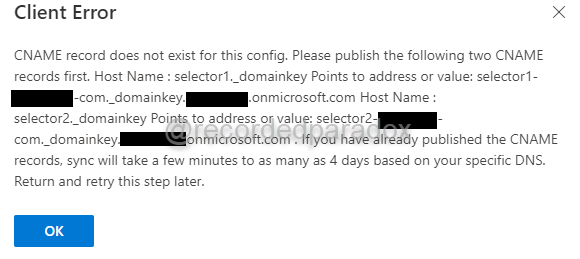
If you receive the Client Error above, you should check your DNS CNAME records and make sure they are right. Microsoft provides details instructions on how to enable DKIM for a custom domain name at https://docs.microsoft.com/en-us/microsoft-365/security/office-365-security/use-dkim-to-validate-outbound-email?view=o365-worldwide. If your DNS CNAME records are correct, you may need to wait as long as 4 days after the DNS CNAME records are created before Microsoft 365 Defender can detect them.7
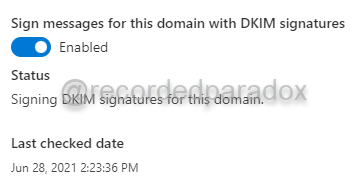
When the DNS CNAME records are created correctly and Microsoft 365 Defender can detect them, you will be able to slide the Sign messages for this domain with DKIM signatures toggle button to Enabled. After Sign messages for this domain with DKIM signatures is enabled, you will see the toggle button show it is enabled. The screen should look like this:
With DKIM enabled for outbound emails sent from your custom domain now, when you send emails the headers will be encrypted using a unique 1024 bit or 2048 bit RSA private key hosted by Microsoft.8 The encrypted headers are added to the email as a signature. If your recipient’s email server is configured to verify the DKIM signatures of emails it receives, then it will request the DKIM public key that the DNS CNAME records for the sending domain name point to and decrypt the DKIM signature. If the email headers match the data from the decrypted DKIM signature, then the email will pass DKIM verification.9
After you DKIM and SPF are configured for your domain name, you should consider configuring Domain-based Message Authentication, Reporting & Conformance (DMARC).
[1] https://docs.microsoft.com/en-us/powershell/module/exchange/get-dkimsigningconfig